Zone Tree
The
To view and edit the zone and room organizational tree, go to
Ribbon: Zone Tree
Pulldown Menu:
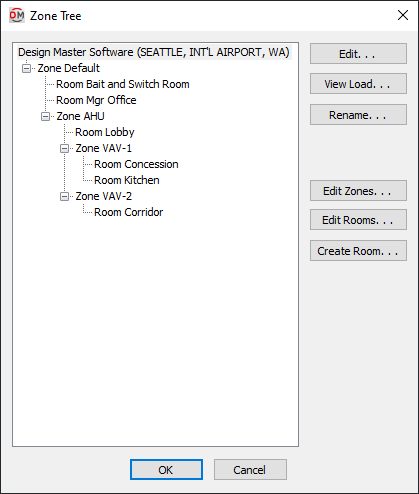
Zone Tree Dialog Box

- Zone and Room Tree ☰ The tree on the left side of the dialog box lists all of the zones and rooms in the project.
The first item in the tree represents the whole project. The label is based upon the Project Name and City set in the Project Info command.
Below the project information are all of the zones. Zones that are not part of any other zone are listed directly under the project information. Other zones are listed below the zone they occupy.
All of the rooms in the project are listed in the zone they occupy.
Zones and rooms can be rearranged by dragging and dropping them in the tree. You can select multiple rooms or zones using the SHIFT and CTRL keys to move them all at once.
-
Press this button to edit the selected item.
If the project name is selected, the Project Info dialog box will appear.
If a zone is selected, the Zones dialog box will appear with the selected zone active.
If a room is selected, the Room List dialog box will appear with the selected room active.
-
Press this button to view the load for the selected item. The Load Detail dialog box will appear.
-
Press this button to rename the selected item.
-
Press this button to create and edit zones. The Zones dialog box will appear. If a zone is selected, it will be the active zone in the dialog box.
-
Press this button to edit rooms. The Room List dialog box will appear. If a room is selected, it will be the active room in the dialog box.
-
Press this button to create a room. See the Create Room section for more information.