Modifying Revit Panel Schedules
Modifying your panel schedules in Revit is easy once you know what to do. The video below goes over the basics. The rest of this article serves as a supplement, providing additional information for each command and setting.
Video
Editing a Panel Schedule Template
To edit an existing panel schedule template, the fastest method is to run the
Manage→ Panel Schedule Templates→Edit a Template command. Simply set your Template type ▾ and Panel configuration ▾, select a template from the Templates ☰ list, then press the button to start making changes. For more information about these fields, see the Manage Panel Schedule Templates Dialog Box section.
You can also use the Manage→ Panel Schedule Templates→Manage Templates command, which provides additional controls for managing your templates as described in the section below.
When making significant changes to a template, making a duplicate using the Manage Templates command is recommended. Saved changes cannot be reverted easily; creating a duplicate ensures you will have a backup of the original template.
Manage Panel Schedule Templates Dialog Box
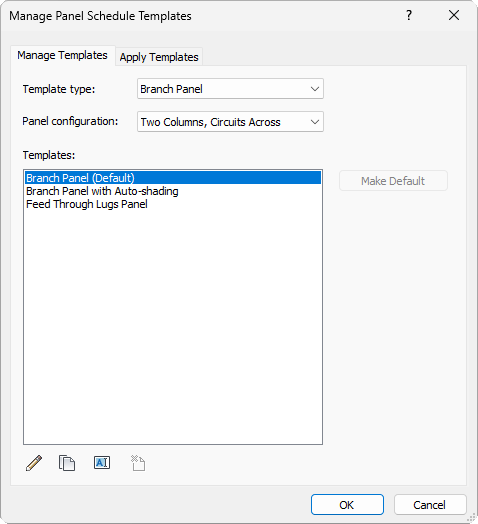
The Manage Templates tab is used to manage and modify your panel schedule templates. The Apply Templates tab is used to apply panel schedule templates to the electrical equipment in your project and is described in the Applying Changes Made to a Template section below.
-
Template type: ▾ The electrical equipment type for which panel schedule templates will be displayed and used. For more information about how you can set which template type each electrical equipment uses, see the Configuring Which Panel Schedule Template Each Electrical Equipment Uses section below.
- Branch Panel Schedules for typical distribution panels. Electrical Equipment that have their Part Type ▾ set to Panelboard use this template type.
- Data Panel Schedules for panels used to power fire alarms, data and security devices, and other low-voltage circuits. Electrical Equipment that have their Part Type ▾ set to Other Panel use this template type.
- Switchboard Schedules for switchboards and similar electrical equipment for which each connection occupies a single circuit, regardless of the number of poles or phases. Electrical Equipment that have their Part Type ▾ set to Switchboard use this template type.
-
Panel configuration: ▾ How the circuit table is configured in the templates. If Template type ▾ is set to Data Panel or Switchboard, this field is set to One Column.
- Two Columns, Circuits Across Circuits are shown in two columns with alternating numbers. Odd circuits are listed in ascending order on the left and even circuits are listed in ascending order on the right. Loads and phases are shown in the middle of the schedule.
- Two Columns, Circuits Down Circuits are shown in two columns with consecutive numbers. The first half are listed in ascending order on the left and the second half are listed in ascending order on the right. Loads and phases are shown in the middle of the schedule.
- One Column Circuits are shown in one column with consecutive numbers. Loads and phases, if applicable, are shown on the right side of the schedule.
-
Templates: ☰ The panel schedule templates available for the selected Template type ▾ and Panel configuration ▾.
-
<Template Name> (Default) The project default for electrical equipment using the selected Template type ▾ and Panel configuration ▾.
When a panel schedule is created for an electrical equipment using the
Create Panel Schedules→Use Default Template command, it will use this panel schedule template.
Use the , , , and icons below the list to make changes to the selected template in the list.
-
-
Sets the project default to the template selected in the list.
Commands Available When Modifying a Template
When you select a panel schedule template to modify, the Modify Panel Schedule Template ribbon will become available. The commands available on that ribbon are described in this section.

Template
Run the Set Template Options command to configure settings that affect the entire panel schedule template. The Set Template Options dialog box will open.
The sections below primarily describe settings available for templates with Template type ▾ set to Branch Panel.
Templates with Template type ▾ set to Switchboard have different formatting options in the Circuit Table section. The checkboxes in that section are not available.
Templates with Template type ▾ set to Data Panel have the settings indicated in the General Settings section and the Column header text orientation ▾ setting in the Circuit Table section. Other settings are not available.
General Settings
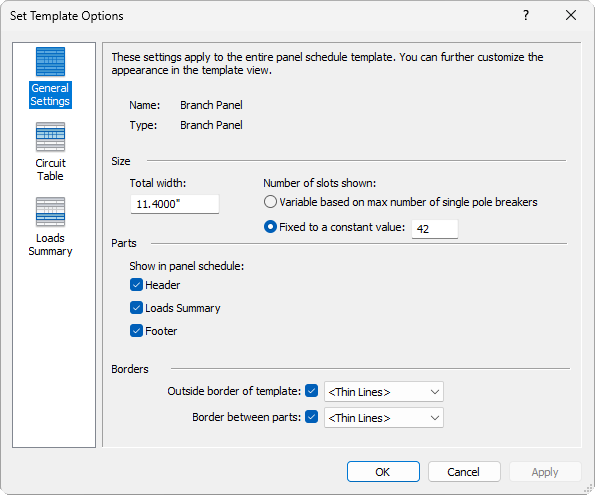
-
Total width: The width of the schedule in inches or millimeters, depending upon the units in the project. Adding, removing, or resizing columns will cause other columns to resize to fill the total width.
-
🔘 Number of slots shown: How many rows are displayed in the circuit table.
- Variable based on max number of single pole breakers The number of rows is based upon the Max Number of Single Pole Breakers parameter for each electrical equipment.
- Fixed to a constant value The circuit table will always have the specified number of rows, regardless of the Max Number of Single Pole Breakers parameter on the electrical equipment.
-
Show in panel schedule: Whether each section is displayed in the panel schedule.
- ☐ Header The section above the circuit table.
- ☐ Loads Summary The section below the circuit table and above the footer.
- ☐ Footer The section below the circuit table and loads summary.
-
☐ Outside border of template: Whether the selected line style is used for the outside border of the panel schedule when inserted on a sheet.
-
☐ Border between parts: Whether the selected line style is used for the lines separating the header, circuit table, loads summary, and footer.
Circuit Table
-
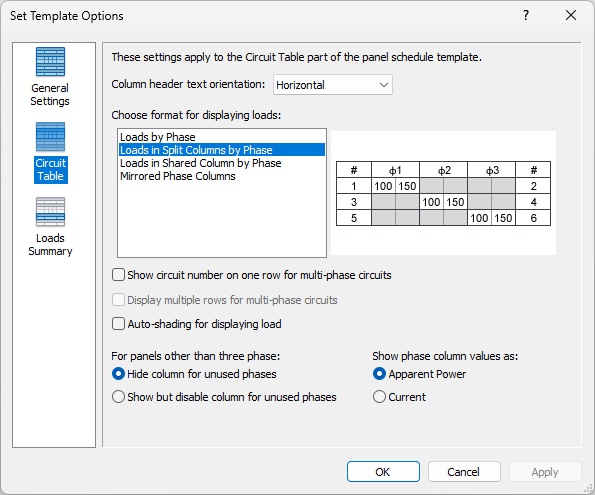
Column header text orientation: ▾ Whether column heading text in the circuit table is oriented horizontally or vertically.
-
Choose format for displaying loads: ☰ How loads and phases are displayed in the circuit table. The preview window provides an example of how the panel schedule could look based upon the selected format.
- Loads by Phase There is a single set of phase columns shared by circuits on the left and right. The load on each circuit is displayed in its own row.
- Loads in Split Columns by Phase There is a single set of phase columns shared by circuits on the left and right. Loads on circuits that share a phase are displayed in the same column in separate cells.
- Loads in Shared Column by Phase There is a single set of phase columns shared by circuits on the left and right. Loads on circuits that share a phase are displayed in the same column, separated by a slash.
- Mirrored Phase Columns There are two sets of phase columns. Loads on left circuits are displayed in the left phase columns. Loads on right circuits are displayed on the right phase columns.
The following options are available for panel schedule templates with Template type ▾ set to Switchboard, or set to Branch Panel and Panel configuration ▾ set to One Column:
- Total Load Only per Circuit A single column displays the total load on each circuit. Loads on each phase are not displayed.
- Separate Phase Loads per Circuit A set of phase columns displays the load on each phase for each circuit.
- No Load Information Load values are not displayed.
-
☐ Show circuit number on one row for multi-phase circuits If this option is enabled, circuits with two-pole and three-pole connections display all circuit numbers in the topmost row for the connection, separated by a comma. If this option is disabled, circuit numbers are always displayed on their respective rows.
-
☐ Display multiple rows for multi-phase circuits If this option is enabled, circuits with two-pole and three-pole connections will be displayed across two and three rows, respectively. If this option is disabled, circuits are always displayed on a single row. This option is only available for panel schedule templates with a One Column panel configuration.
-
☐ Auto-shading for displaying load Whether cells in load columns are automatically shaded for circuits with no connections.
-
🔘 For panels other than three phase: A single panel schedule template can be used for both single-phase and three-phase electrical equipment. This setting controls whether phase columns for single-phase electrical equipment are hidden, or are visible but do not display information.
-
🔘 Show phase column values as: Whether phase columns display Apparent Power parameter values or Current parameter values for each circuit.
Loads Summary
-
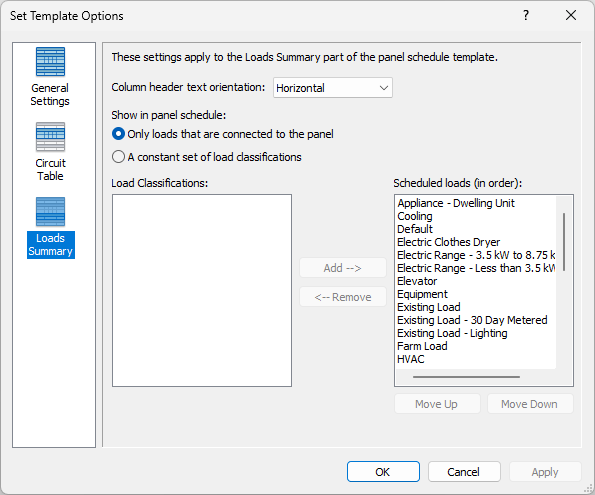
Column header text orientation: ▾ Whether column heading text in the loads summary is oriented horizontally or vertically.
-
🔘 Show in panel schedule: Whether the load types displayed in the loads summary are dynamic or static.
- Only loads that are connected to the panel The loads summary will adjust dynamically to display all of the nonzero load classifications on each electrical equipment. Load classifications not connected to the equipment will not be displayed. The , , , and buttons will be disabled.
- A constant set of load classifications The load classifications in the Scheduled loads (in order) ☰ list will be displayed, regardless of the loads on the electrical equipment. Use the , , , and buttons to set which loads will be displayed and the order in which they appear in the loads summary.
warning
Using this setting can cause the loads summary to not include loads that are connected to the equipment.
-
Load Classifications: ☰ The load classifications defined in the project that will not be displayed in the panel schedule. If 🔘 Show in panel schedule is set to Only loads that are connected to the panel, this list will be empty.
-
Scheduled loads (in order): ☰ The load classifications defined in the project that will be displayed in the panel schedule. If 🔘 Show in panel schedule is set to Only loads that are connected to the panel, this list will include every load classification.
Parameters
Use the commands in this section to set and customize the parameters that appear in the panel schedule template.
If you select a load column in the circuit table, these commands will be disabled. See the Circuit Table section for more information about modifying how loads are displayed.
-
Choose Category: ▾ Sets the parameter category for which parameters will be displayed in the Add Parameter ▾ field.
- Electrical Equipment Displays parameters stored on the electrical equipment. Can be added to the header, loads summary, and footer.
- Project Information Displays parameters stored in the
Project Information command. Can be added to the header and footer.
- Electrical Circuits Displays parameters stored in each circuit connected to the electrical equipment. Can be added to the circuit table.
-
Add Parameter: ▾ Sets the parameter displayed in the selected cell. The values in this list are based upon the Choose Category ▾ value.
-
Remove Parameter Removes the parameter from the selected cell. If the selected cell is part of the circuit table or loads summary, the parameter will be removed from the entire column and the column heading will be erased.
-
Format Unit Available when you select a parameter with a unit, such as length or current. Use this command to configure how the value is displayed the same way as configuring units in the
Project Units command.
-
Calculated Value Enters a formula in the selected cell. Defining formulas with this command works the same way as defining parameter formulas in model families. For an example of how this command can be used to display different values based upon the main disconnect type for the electrical equipment, see Main Disconnect Type Revit Formulas.
-
Combine Parameters Used to display two or more parameters in a single cell or column. Combining parameters with this command works the same way as configuring annotation tag families.
Columns and Rows
Use the commands in this section to configure the columns and rows in the panel schedule template.
-
Freeze Rows and Columns Cells in the template can be resized using grips on the grid lines between cells. Use this command to disable the grips, preventing you from unintentionally resizing the template.
-
Insert Column Inserts a new column to the left or right of the selected cell. Typically, the column for the selected cell will be resized to maintain the Total width specified in the General Settings section of the Set Template Options command.
-
Delete Column Removes the selected column. Typically, the column to the right of the removed column will be widened.
-
Resize Column Resizes the selected column to the specified width measurement. Typically, the column to the right will also be resized to maintain the Total width specified in the General Settings section of the Set Template Options command.
-
Insert Row Inserts a new row above or below the selected cell.
-
Delete Row Removes the selected row.
-
Resize Row Resizes the selected row to the specified height measurement.
Cells
Use the commands in this section to modify the appearance of cells in the panel schedule template.
-
Merge/Unmerge Merges selected cells across multiple rows and/or columns into a single cell, or separates a selected merged cell into multiple cells.
-
Insert Graphic Imports an image file into the selected cell. You will be prompted to select an image file from your computer or network. The image will be scaled down to fit the selected cell.
tipIf you run this command with multiple cells selected, the cells will be merged.
-
Edit Borders Adds, removes, and modifies the line style of borders around and between the selected cells.
-
Edit Shading Sets the background color of the selected cells.
Text
Use the commands in this section to modify the appearance of text in the panel schedule template.
-
Edit Font Sets the font, size, style, and color of the selected cells.
-
Horizontally Align Sets whether text aligns to the left, right, or center of the selected cells.
-
Vertically Align Sets whether text aligns to the top, middle, or bottom of the selected cells.
Template Editor
Use the commands in this section to save or discard changes to the panel schedule template and close the template editor.
-
Finish Template Saves any changes made to the panel schedule template and closes the template editor.
-
Cancel Template Closes the template editor without saving changes made to the panel schedule template.
Applying Changes Made to a Template
Changes to panel schedule templates are not applied automatically. After making changes to a template, you must update any panel schedules currently using that template in your project.
You can update individual panel schedules by opening the schedule and running the Modify Panel Schedule→ Change Template command. Select a new template from the list, or simply press the button to update the template currently being used. This method is helpful when reviewing changes to a panel schedule template or updating a template used by a few pieces of electrical equipment.
If you need to update or apply a new template to several panel schedules, you can use the
Manage→ Panel Schedule Templates→Manage Templates command.
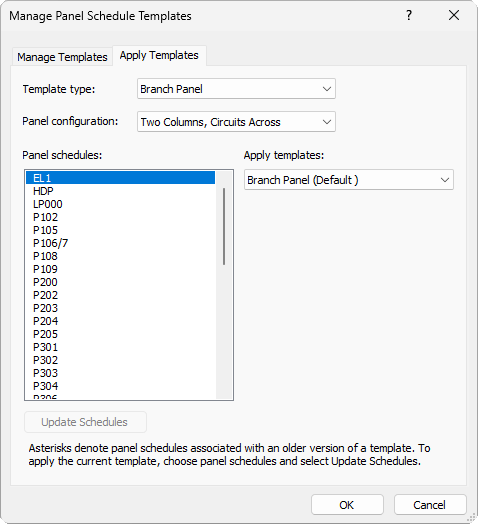
On the Apply Templates ▾ tab, you can select one or more panel schedules from the list and apply a panel schedule template to all of the selected schedules at once using the Apply templates ▾ field. Additionally, panel schedules using a template that has since been updated will be moved to the bottom of the list and marked with an asterisk (*). You can select those schedules and press the button to update them to the latest version.
Configuring Which Panel Schedule Template Each Electrical Equipment Uses
The panel schedule template used by each electrical equipment is determined based upon settings in the equipment family, the Manage Templates command, and the panel schedule itself.
In the Equipment Family
In the model family, the category, which determines whether recognizes the family as an electrical equipment, is set in the Family Category and Parameters command. To function as an electrical equipment to which other equipment and devices can be circuited and electrical parameters can be set, the Family Category ☰ must be set to Electrical Equipment.
Electrical equipment have a Part Type ▾ parameter to further define the family, which can be set in the Family Category and Parameters dialog box or in the Properties palette. Among other aspects, this parameter determines which Template type ▾ will be used for the panel schedule:
- Equipment Switch Cannot have a panel schedule.
- Other Panel Uses templates in the Data Panel template type.
- Panelboard Uses templates in the Branch Panel template type.
- Switchboard Uses templates in the Switchboard template type.
- Transformer Cannot have a panel schedule.
If Part Type ▾ is set to Panelboard, a Panel Configuration ▾ parameter is also available. This parameter determines the ordering and appearance of the circuit table in the panel schedule. See the Manage Panel Schedule Templates Dialog Box section for more information about the settings available.
In the Manage Templates Command
Use the Manage Templates command to modify the panel schedule templates available in the project.
Electrical equipment can use any panel schedule template consistent with the Part Type ▾ and, if applicable, Panel Configuration ▾ settings in the equipment family. When creating schedules using one of the Create Panel Schedules commands, you can specify a template or use the default template for that Template type ▾ and Panel configuration ▾.
See the Manage Panel Schedule Templates Dialog Box section for more information.
In the Panel Schedule
After a panel schedule has been created, you can change the template using the Change Template or
Manage Templates command. See Applying Changes Made to a Template for more information.