Feeder IDs
This article describes the different feeder ID formats available, how to change formats mid-project, and how to create custom feeder IDs.
Feeder ID Formats
When feeder IDs are automatically generated, you can set the naming conventions for the IDs in the One-Line Diagram section of the Options command.
Find the Feeder ID format ▾ option and set the format you want to use.
If you need to change the feeder ID format after starting a project, visit the Changing Feeder ID Formats section below.
There are three additional options related to creating feeder IDs:
-
Automatically create feeder IDs: ▾ Sets whether feeder IDs are automatically generated based upon the selected Feeder ID format ▾.
If this option is set to No, you will be prompted to define each feeder ID as it is generated. This is useful if you want to create custom feeder IDs; otherwise, set it to Yes.
-
Copy feeder IDs to master schedule when created / Transfer feeder IDs from master schedule if possible: ▾ These options help ensure consistent feeder IDs across projects.
When both options are enabled, feeder IDs will be pulled from the master schedule if they exist for the feeder types in the project; if a feeder ID does not exist, it will be generated and copied to the master schedule for future projects.
noteIf Feeder ID format ▾ is set to Sequential, these options are disabled.
Short

The Short format uses a compact format that describes the feeder.
If you combine the wire count for neutral and hot wires, this format lists the ampacity of the feeder and the number of wires. Feeders with an equipment ground (NEC 250.122) do not have any additional information. Other feeders will have the following letters added to the end of the ID:
- J Service ground (NEC 250.102)
- U No ground
- I Isolated ground
If you separate the wire count for neutral and hot wires, this format lists the ampacity of the feeder. The number of hot wires is listed if it is 1 or 2. Feeders with a neutral and an equipment ground (NEC 250.122) do not have any additional information. Other feeders will have the following letters added to the end of the ID:
- NN Two neutrals
- D No neutral
- J Service ground (NEC 250.102)
- U No ground
- I Isolated ground
If two feeders use the same ID but are different (e.g., same ampacity and wire count but different material or conduit size), .A will be added to the end of the second ID. Subsequent IDs will have .B, .C, etc.
Long

The Long format uses a more descriptive format for the feeder ID that is meant to be easily understood without referring to the feeder schedule.
First, the feeders are labeled with the ampacity of the feeder.
Next, the number of wires in the feeder is listed. If you combine the wire count for neutral and hot wires, this format lists the combined neutral plus hot wire count. If you do not combine the wire count for neutral and hot wires, this format lists the hot wire count, then one of the following neutral designations:
- N One neutral
- NN Two neutrals
- D No neutral
Finally, if there is a ground, one of the following designations is added:
- G Equipment ground (NEC 250.122)
- J Service ground (NEC 250.102)
- IG Isolated ground
If two feeders use the same ID but are different (e.g., same ampacity and wire count but different material or conduit size), -A will be added to the end of the second ID. Subsequent IDs will have -B, -C, etc.
Size + Letter

The Size + letter format lists the ampacity and a single letter. The letter after the ampacity is consistent based upon the type of feeder but is not intended to be descriptive by itself.
If you combine the wire count for neutral and hot wires, the following letters are used:
- A 2 wires, no ground
- B 2 wires, ground
- C 3 wires, no ground
- D 3 wires, ground
- E 4 wires, no ground
- F 4 wires, ground
- G+ Other configurations as they come up in a project.
If you do not combine the wire count for neutral and hot wires, the following letters are used:
- A 1 hot wire, neutral, no ground
- B 1 hot wire, neutral, ground
- C 2 hot wires, no neutral, no ground
- D 2 hot wires, no neutral, ground
- E 2 hot wires, neutral, no ground
- F 2 hot wires, neutral, ground
- G 3 hot wires, no neutral, no ground
- H 3 hot wires, no neutral, ground
- I 3 hot wires, neutral, no ground
- J 3 hot wires, neutral, ground
- K+ Other configurations as they come up in a project.
Sequential

The Sequential format uses a number for the ID. Unlike other feeder ID formats, which are generated based upon various properties of the feeder, sequential feeder IDs are generated as a series of numbers ordered by ampacity and when they are generated.
As you work on your design, new feeder IDs are added to the end of the sequence. For example, if you draft 100A, 200A, and 150A feeders all at once (labeled 1, 3, and 2, respectively), then add a 60A feeder later, it will be labeled 4. The IDs for the existing feeders will not change.
Once your initial design is ready for publishing, we recommend deleting and redefining all of your feeder IDs so they will be nicely ordered. Using the example above, the 60A feeder ID will change to 1, the 100A to 2, and so on.
When preparing to publish revisions, we recommend not deleting all of the feeder IDs. This will cause the IDs for your original feeders to change as well. Instead, only delete those added during revisions; this ensures the new set of feeder IDs will be in order without disrupting the original set of feeder IDs. For example, if your initial design has feeder IDs 1-15, only delete feeder IDs 16 and up.
Changing Feeder ID Formats
If you change your feeder ID format at the beginning of a new project, you don't need to do anything else—when you create your one-line diagram, feeder IDs will be generated based upon the selected format.
If you change your feeder ID format during a project, some additional work is required to change the format for existing feeders:
-
After you have changed the feeder ID format, run the Feeder IDs command.
-
Press the button. The Delete Multiple Feeder IDs dialog box will open.
-
Select all of the feeder IDs in the list and press the button.
-
Press the button to close the dialog box.
-
Run the Update One-Line Diagram command.
The feeder IDs on the one-line diagram will be redefined based upon the new feeder ID format.
Troubleshooting
I followed the instructions, but my feeder IDs either didn't change or changed to something different than the format I set. What happened?
This can occur when your project pulls feeder IDs from the master schedule. There are two solutions:
-
In the One-Line Diagram section of the Options command, find the Transfer feeder IDs from master schedule if possible ▾ option. Set this option to No and press the button. Then repeat the steps above.
-
Follow the steps above, but run the master
Feeder IDs command for step 1 instead.warningDo not delete feeder IDs from the master schedule unless you're sure they won't be used for other projects.
Using Custom Feeder IDs
If none of the built-in feeder ID formats work for your standards, you can define custom feeder IDs. Custom feeder IDs can be defined one-by-one as they are generated, or all at once when you start a project.
First, you will need to change some settings in the One-Line Diagram section of the Options command:
-
Feeder ID format: ▾ This option sets the format used when feeder IDs are generated automatically. When creating custom feeder IDs, the Feeder ID field is initially populated based upon this format; therefore, selecting a format that is close to your custom format will save you some time.
-
Automatically create feeder IDs: ▾ This option sets whether feeder IDs are automatically generated based upon the selected Feeder ID format ▾. If you want to define your custom feeder IDs as they are generated, set this to No.
-
Copy feeder IDs to master schedule when created / Transfer feeder IDs from master schedule if possible: ▾ These options help ensure consistent feeder IDs across projects. When both options are enabled, feeder IDs will be pulled from the master schedule if they exist for the feeder types in the project; if a feeder ID does not exist, it will be generated and copied to the master schedule for future projects.
Define Feeder IDs as Needed
As you draft your one-line diagram, the New Feeder Callout ID dialog box will open any time a feeder is inserted that does not have a feeder ID already defined:
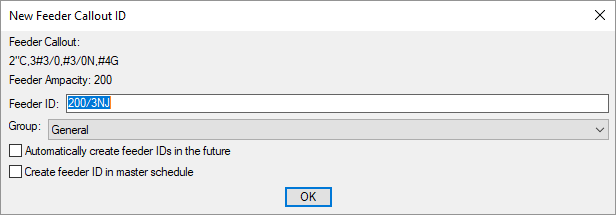
Enter your desired feeder ID in the Feeder ID field.
You can also select a feeder ID group, toggle whether the feeder ID is copied to the master schedule (this is enabled by default if you enabled the Copy feeder IDs to master schedule when created ▾ option), and toggle whether future feeder IDs for this project are created automatically (not recommended for defining custom feeder IDs).
Define Feeder IDs at Project Start
If you want to define several feeder IDs ahead of time, you can do this using the Create Feeder ID dialog box in the Feeder IDs command.